
由于202.195.187.9服务器的IP为校内局域网IP,校外无法访问,注意:
接下去的使用实践流程:
由于.9服务器是内网IP,可以从.9访问外面的云主机(可以出),但外面的云主机不认识我们内网的.9服务器(进不来),所以后续的操作里,可以先登录到.9,把.9当local,把云主机当remote server。(由于网络不是双向互通,所以暂时没办法互换身份)
登录.9服务器;创建目录;生成一个1到100等差数列的文件;将passwd文件链接到这个目录并重新命名
mkdir -p ~/mylinux/remotecontrol
seq 1 100 > ~/mylinux/remotecontrol/`whoami`.counting
ln -s /etc/passwd ~/mylinux/remotecontrol/njmu.server.passwd注意:接下来的实践中,要记得把我命令中的bingdwendwen@121.199.6.207替换成你自己云主机上能用的用户名和IP地址!
ssh-keygen - creates a key pair for public key authentication
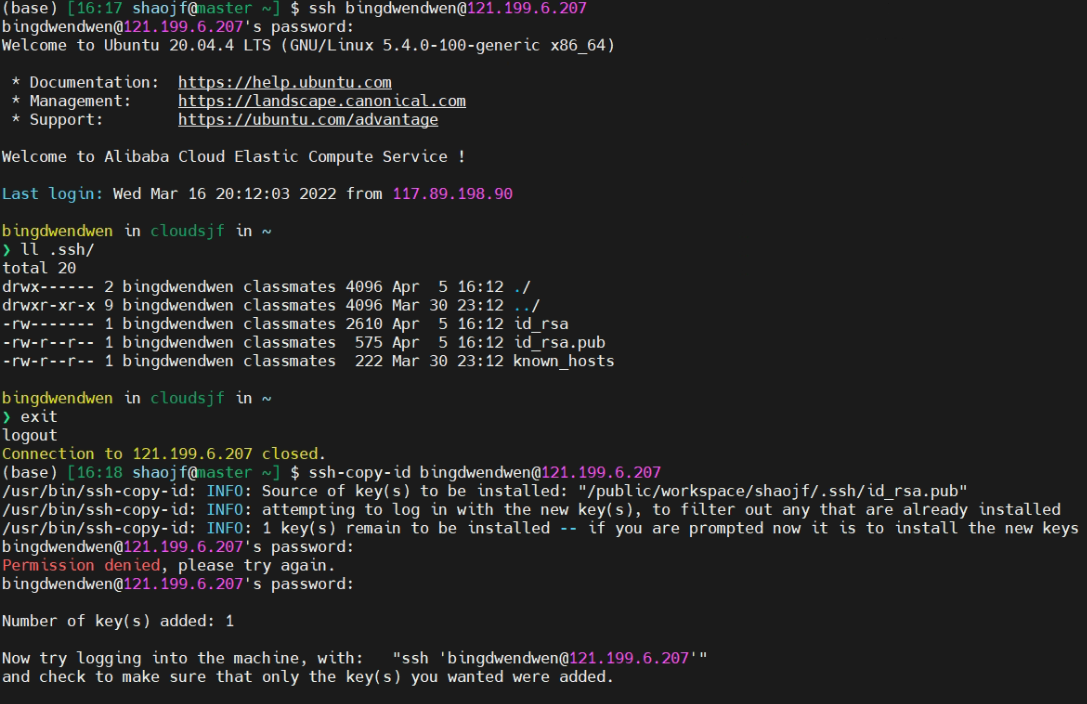
登录.9服务器,运行ssh-keygen,默认将在主目录下创建.ssh子目录,并在其中生成两个文件(因为我的账号在.9已经运行过这个命令,所以我这个截图是用一个全新的账号雪容融生成的,主要是给你们示意用的)。
无需修改秘钥存放的路径,直接按回车即可。
可不设置passphrase,除非你理解这个通行口令,且愿意每次都多此一举输一遍通行口令。
ssh-keygen

ssh-copy-id - configures a public key as authorized on a server
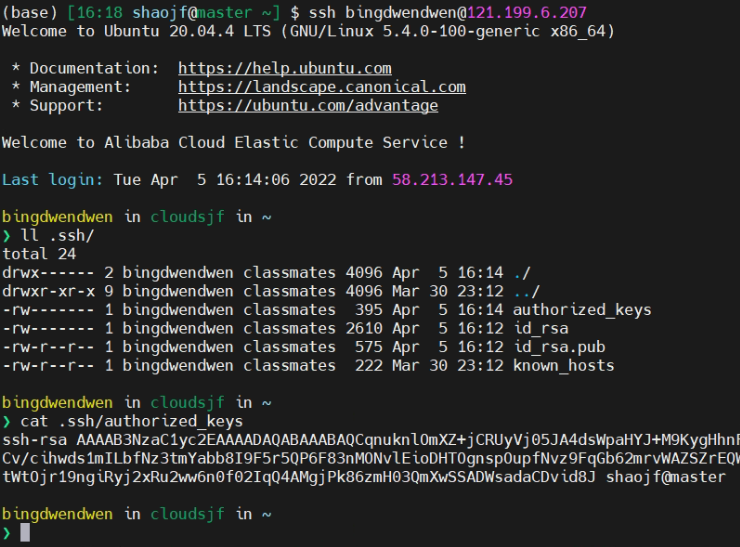
ssh-copy-id bingdwendwen@121.199.6.207
# 注意:把用户名和ip地址替换成你自己的
# 这个过程中,需要输一次远程主机对应用户(本案例中是冰墩墩)的密码
本质上,是把A主机用户的id_rsa.pub的内容追加到B主机用户的authorized_keys文件中,在ssh登录过程中,server端会检查客户端的key是否是允许的,如果是允许列表中,则无需再输入密码。
提示:是追加,不会清空主机B上原来的公钥们
加密传输,用于远程连接
支持:用户名+密码登录;用户名+密钥(key)登录
用法:ssh [选项] destination [命令] (方括号里的表示可选,所以ssh和目的地是必须要写的)
常用用法:ssh username@host (如果当前终端的用户名跟远程服务器端同名,则用户名可省略。)
常用选项:
-X Enables X11 forwarding.
-Y Enables trusted X11 forwarding.
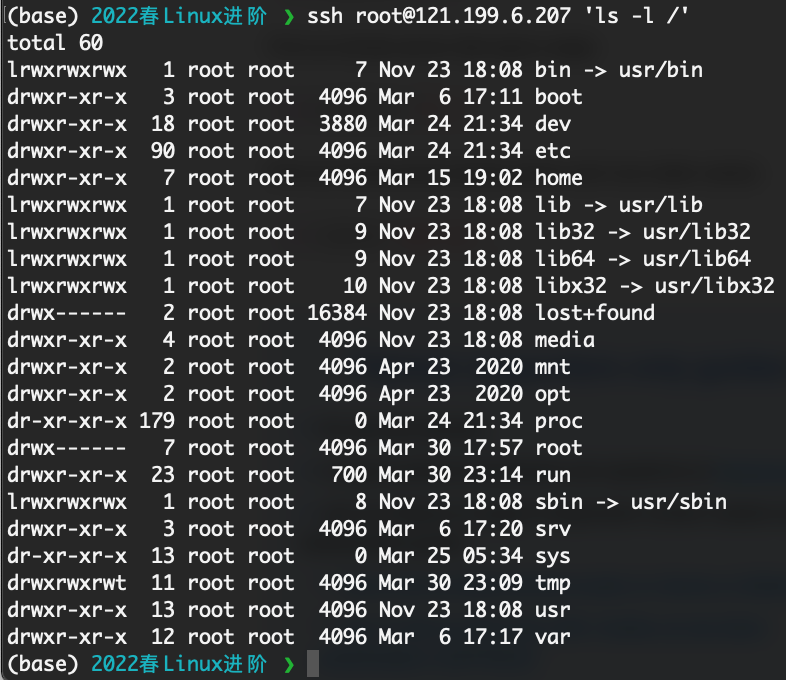
例如在macOS系统(已自带ssh客户端),打开系统自带的终端,即可通过ssh 用户名@主机ip 来登录远程服务器。如果只是需要登录服务器一次性运行命令,可以在ssh命令的最后把命令放在单引号里面:
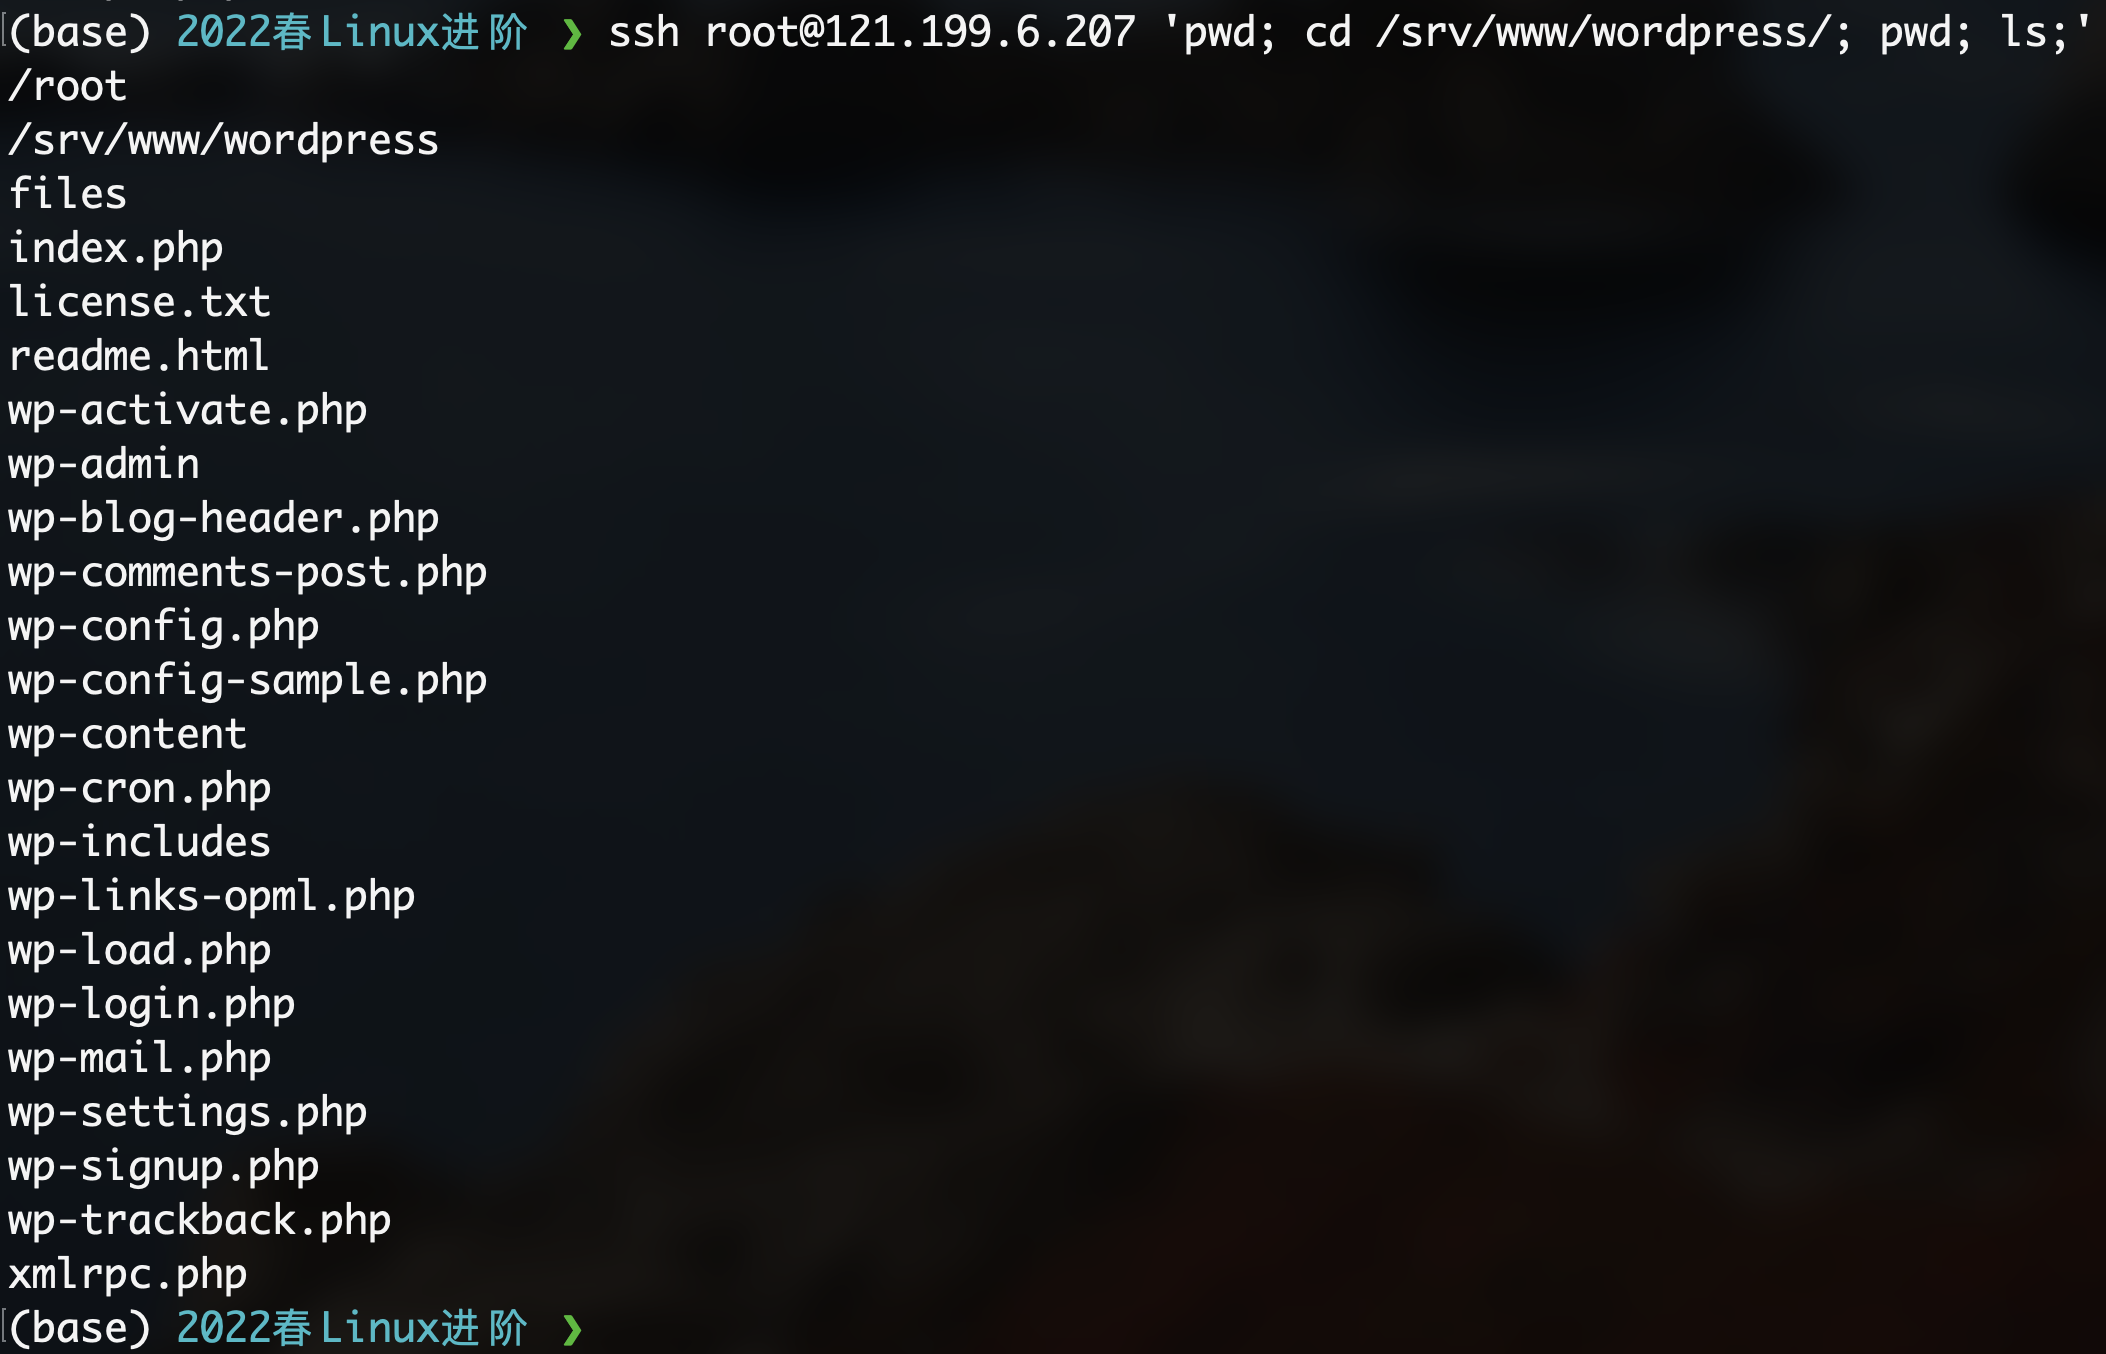
单引号里可以写多个命令,用分号分隔,可依次运行:
scp - file transfer client with RCP-like command interface
用法:scp [选项] [[user@]host1:]file1 ... [[user@]host2:]file2
用途:把file1复制到file2,两个文件位于不同主机(如果要复制目录,记得加上选项-r)
注意:local短的用户名@host不写,remote端必须要写host。如果local跟remote端用户名同名,则用户名可省略。scp /etc/passwd bingdwendwen@121.199.6.207:/home/bingdwendwen/njmu.passwd
ssh bingdwendwen@121.199.6.207 'ls -l /home/bingdwendwen/'
ll /etc/passwd
# 注意:把用户名和ip地址替换成你自己的
# 解释:这个操作是把passwd文件复制到远程冰墩墩主目录下,且重命名为njmu.passwd。
# 解释:如果冒号后仅写成/home/bingdwendwen/这个目录,则复制过去的文件保留原名字。
# 解释:因为远程冰墩墩已经信任.9的秘钥,所以不需要输密码。
# 解释:此处分别在ssh命令后加ls -l及在本地ll,是为了给大家看一下,文件大小是一样的,你复制的没错!
scp bingdwendwen@121.199.6.207:/etc/passwd .
# 注意:把用户名和ip地址替换成你自己的
# 解释:这是把云主机的/etc/passwd文件复制到local主机上的当前工作路径,用ls -l(或者ll)命令看看当前目录下是不是多了个passwd文件?
scp -r ~/mylinux/ bingdwendwen@121.199.6.207:/home/bingdwendwen/
ssh bingdwendwen@121.199.6.207 'ls -l /home/bingdwendwen/mylinux/remotecontrol'
# 注意:把用户名和ip地址替换成你自己的
# 解释:把local的符号链接当做文件复制过去sftp - file transfer client with FTP-like command interface
用法:sftp [user@]host[:file ...]
用途:登录后用get下载,put上传,以及其他命令。
好处:交互式的,先登录了,再一边看一边决定做什么。
注意:如果local跟remote端用户名同名,则用户名可省略。bye Quit sftp.
exit Quit sftp.
quit Quit sftp.
cd [path]
Change remote directory to path.
lcd [path]
Change local directory to path.
ls [-1afhlnrSt] [path]
Display a remote directory listing of either path or the current directory if path is not specified.
lls [ls-options [path]]
Display local directory listing of either path or current directory if path is not specified.
mkdir path
Create remote directory specified by path.
lmkdir path
Create local directory specified by path.
pwd Display remote working directory.
lpwd Print local working directory.
get [-afpR] remote-path [local-path]
Retrieve the remote-path and store it on the local machine.
put [-afpR] local-path [remote-path]
Upload local-path and store it on the remote machine.
reget [-fpR] remote-path [local-path]
Resume download of remote-path.
reput [-fpR] local-path [remote-path]
Resume upload of local-path.
# 注意:lls,lpwd,lcd是作用于local-path的对应命令sftp bingdwendwen@121.199.6.207
# 然后ls、lls确认远程和本地端当前目录的内容
# lcd在本地端切换目录
# pur -r remotecontrol把整个remotecontrol目录上传到远程冰墩墩主目录
# 可以注意到只上传了等差数列文件,没有把符号链接传上去
# quit可以退出(跟bye和exit一样的,我就是习惯了quit)
# 留给你们自己试试get下载远程主机上的东西到.9上,比如下载个wordpress目录的文件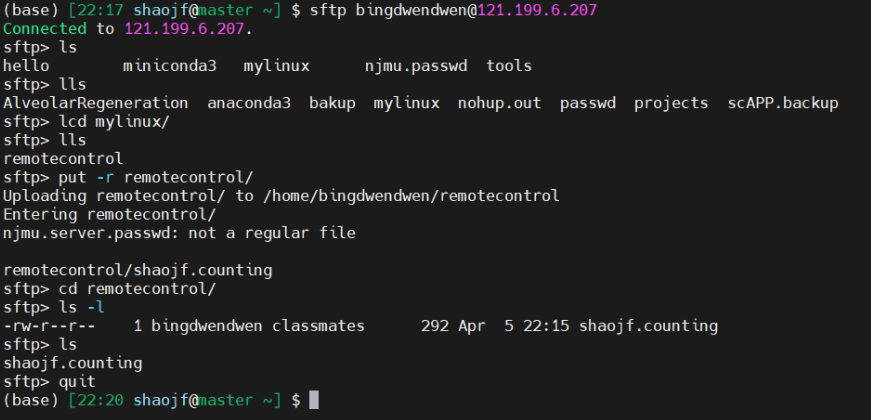
rsync - a fast, versatile, remote (and local) file-copying tool
用法:rsync [OPTION]... SRC [SRC]... DEST
or   rsync [OPTION]... SRC [SRC]... [USER@]HOST:DEST
or   rsync [OPTION]... SRC [SRC]... [USER@]HOST::DEST
or   rsync [OPTION]... SRC [SRC]... rsync://[USER@]HOST[:PORT]/DEST
or   rsync [OPTION]... [USER@]HOST:SRC [DEST]
or   rsync [OPTION]... [USER@]HOST::SRC [DEST]
or   rsync [OPTION]... rsync://[USER@]HOST[:PORT]/SRC [DEST]
用途:同步文件 -v, --verbose increase verbosity
-a, --archive archive mode; equals -rlptgoD (no -H,-A,-X)
-r, --recursive recurse into directories
-l, --links copy symlinks as symlinks
-L, --copy-links transform symlink into referent file/dir
-h, --human-readable output numbers in a human-readable format
--partial keep partially transferred files
--progress show progress during transfer
-P same as --partial --progress
# -l是把链接当链接,-L会把链接指向的源文件或目录同步过去,就不再是个链接了。rsync -avlP ~/mylinux/ bingdwendwen@121.199.6.207:/home/bingdwendwen/rsync/
ssh bingdwendwen@121.199.6.207 'ls -l /home/bingdwendwen/rsync/remotecontrol'
# 用途:把.9主目录下的mylinux整个儿同步到云主机上,并显示进度
# 解释:符号链接也是被当做链接同步过去,到云主机上看到的passwd就是那边的passwd了。
# 解释:时间戳信息也保留了
# 解释:这个用法对于服务器搬家特别管用。
# 解释:装软件的过程中有很多文件是链接形式,前面的scp -r和sftp在处理链接问题上都有点自作主张,不适用于原样搬家。
# 解释:而rsync就很听话。我的conda从.6到.9服务器就用了rsync -l,搬过去直接就可用。
# 解释:其实-a选项已经包含-l了,不用再重复写-l了。